Collection of resources: corpus linguistics, e-learning, natural language processing, teaching English as a foreign language and tools related to these topics
Best free tier solution to run moodle for testing or development purposes (storage is not enough for production environments): https://www.oracle.com/cloud/free/
For month I’ve been trying to get this to work and I finally found a solution, which is a lot easier than I initially thought it would be.
Problem: If you want to connect remotely to a Linux desktop (running ThinLinc server) via ThinLinc* client, it has often been impossible to get the remote desktop working at the native resolution of a 4K display (3840×2160). In my case the highest possible resolution to choose from in the remote systems’ display settings was 1920×1080, resulting in a blurred linux desktop. While ThinLinc still offered a superior remote desktop experience to all tools tested, the blurred display kept bugging me. My aim was to get the sharpest and most responsive Cendio ThinLinc sessions on high-resolution displays possible.
NB. The following workaround also helped me solve display resolution problems with other remote desktop clients (e.g. NoMachine, VNC variants).
[Update 19/02/2025]: The best alternative to ThinLinc for connections to ARM-based linux and macOS remote desktops (e.g. RasperyPI, Oracle Free Tier Ampère Instances, Apple’s M1/M2/M3/M4) is RustDesk, which is available for all platforms and allows peer-to-peer connections (ip<->ip) without the need for a server if used in small homelab situations. Unfortunately, thinlinc server is only available for Intel-/AMD-based systems.
RustDesk does offer superior handling of display resolutions, however, for remote desktops on Intel-/AMD-based platforms thinlinc is by far the best solution for connections to Linux desktops. In these cases, I prefer to use the following workaround (also see overview of my favourite RDP client<->server combinations)
Solution on Windows 11 and macOS with 4K external display and Mac retina display
(might also work on other high-resolution displays)
Step 1 – Set display scaling of the display(s) you want to use for your remote connection to 100% prior to initiating the remote connection
On Windows:
Right-click on Windows-Desktop and choose: “Display settings”. Scroll down to scaling and make sure that your system does not use “custom scaling”. Choose 100% from the drop-down menu. Alternatively, you can navigate to Windows Settings > System > Display settings to find the same menu.
(Screenshots are from a German version of Windows 11)
NB: If you are using more than one display, make sure to adjust scaling to 100% on all screens you intend to use for your remote connection. Also make sure that there is no “custom scaling” enabled.
On macOS:
On macOS, display scaling can be set under: System Preferences/Displays:
Choose the setting labelled “More Space” for native retina display’s resolution.
NB: If you are using more than one display, make sure to adjust scaling to 100% on all screens you intend to use for your remote connection.
Step 2 – Now, start thinlinc client and connect to your remote linux desktop:
(Don’t be discouraged by the tiny icons and font size, you can switch back to your normal scaling as soon as your thinlinc session is over.)
Step 3 – On the remote system, you now have the opportunity to choose your native display resolution and adjust scaling to a more convenient factor:
When working with corpora it is sometimes useful to be able to generate random samples from corpus results for manual analysis (e.g. to determine distribution percentages or recall/precision of queries). BNCweb, CQPweb or (No)SketchEngine provide a thin function for this purpose. However, if the results of corpus queries are only available as text files, there is a random thinning option available as part of GNU coreutils. The examples below create a random sample of 100 lines (adapt sample size according to your project’s needs). The reliability of manually checked results can be improved by obtaining several samples of 100 lines (typically 2-3) and using averaged scores.
On Linux, there is a very easy straight-forward way to achieve this (type: man shuf for details):
cd path_to_text_file

shuf -n 100 results.txt
In order to save the random sample into a new text file, specify an output file: shuf -n 100 -o random_sample.txt results.txt
On Mac OSX, it is slightly more complicated, as a Linux-like package manager (e.g. Homebrew) and the coreutils package have to be installed first (gshuf Tutorial OSX and corresponding random_sample.zip for novice users who are not familiar with OSX terminal). Once the gshuf command is available, the invocation is anologous (type: man gshuf for details):
cd path_to_text_file

gshuf -n 100 results.txt
In order to save the random sample into a new text file, specify an output file: gshuf -n 100 -o random_sample.txt results.txt
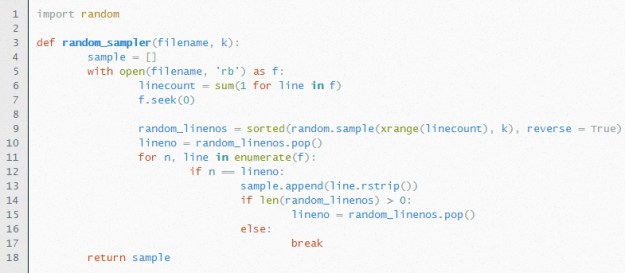
On Windows, the following Python code snipped could be used to achieve a similar result (please let me know if there are any built-in options):
Quick step-by-step guide:
Get a random sample of 100 lines per text file on Mac OSX:
Steps 1 to 4 only have to be followed once per computer. After that only steps 6 & 8 are needed.
Open Terminal window:
Install „Homebrew“ package manager (this allows you to install additional Unix/Linux programmes on your Mac). Copy and paste the following line into the Terminal window (all one line):
If it asks you to install “Commandline developer tools”, say YES (might take a while).
Wait for installation to finish, press RETURN and enter your password (the one you use to log on to your Mac).
Type: brew install coreutils
Extract attached zip to your Desktop (make sure that the folder random_sample is visible on your Desktop and that there is a file called test.txt in it.
Go back to Terminal window and type: cd Desktop/random_sample
And now comes the actual shuffling bit: gshuf -n 2 test.txt
Instead of test.txt you can use your query results and instead of 2, you can enter the size of your sample.
If you want to save the sample into a new text file instead of just displaying it in the terminal window, type: gshuf -n 2 test.txt > random_sample1.txt and the results will be saved in the file txt in the same folder (feel free to adapt filenames and be aware of the fact that if you use one name twice the contents of the file with the same name will be overwritten).
Explanation of the different parts of the command:
shuffle command
sample size (display shuffled lines, up to the line number specified by -n switch)
name of file you want to shuffle (lines)
write output into file
name of output file
gshuf
-n SAMPLESIZE
test.txt
>
out.txt
An easy way to navigate to a particular folder: type cd [space] into the terminal window, drag&drop the folder you want to work in from your Finder into the Terminal and press RETURN/ENTER.
Other basic folder/directory navigation from Terminal window:
CQPweb is a web-based graphical user interface (GUI) for some elements of the CWB – and in particular, the CQP query processor.
CQPweb is designed to replicate the user-interface of the popular BNCweb tool, which also (in its most recent versions) uses CQP as a back-end. Like BNCweb, CQPweb uses a database alongside the CWB to provide extra functions beyond those built into CWB/CQP. However, unlike BNCweb, CQPweb can be used with any corpus.
CQPweb is especially suitable for students, non-linguists, and others for whom a Unix-like command-line is a terrifying prospect. […]
[More] screenshots of CQPweb can be downloaded from this link.